I have created a new domain, jerry.education, as a place to aggregate all of my educational resources. I feel it will help more people find my digital literacy resources than just hosting them here, as the URL itself is rather self-descriptive. I am going to leave the Desktop Publishing Projects page here for legacy purposes, but going forward, new stuff will be posted on jerry.education.
Wifi Signal Map at My Place
Today I used the free Ekahau HeatMapper on Windows to map out the wifi signal strengths here at the house. I took the resulting map into Photoshop and made, what I consider, a fairly nice map. (Note that it is not perfectly to scale, because I don’t have an actual floor plan to use as the map.)
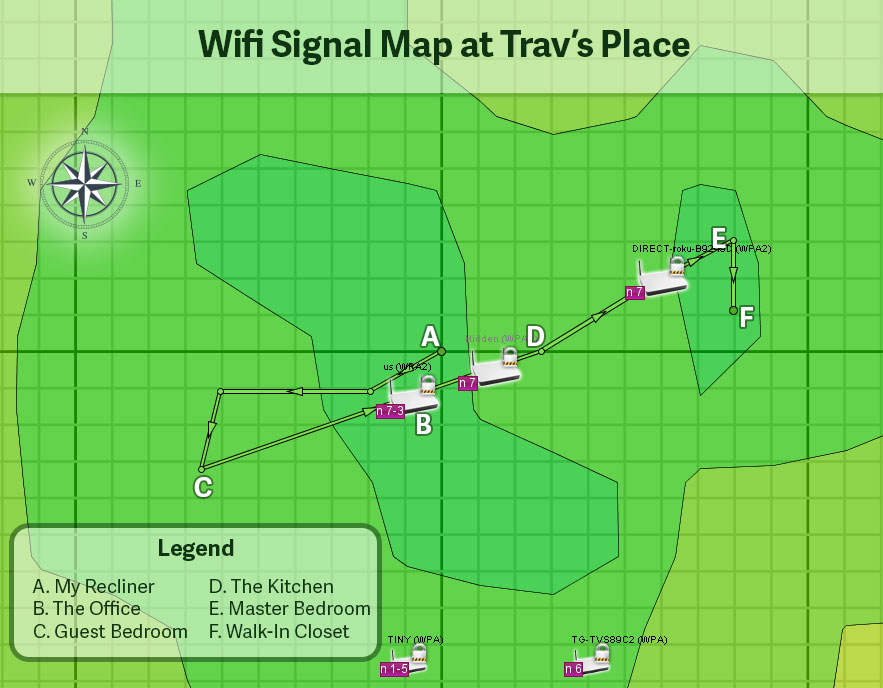
Here’s the wifi signal map taken at my house on June 26, 2015.
HeatMapper seems pretty accurate since the indicated wifi signal strengths match what my devices usually tell me. The program could definitely help to troubleshoot slow wifi in a crowded neighborhood as it provides channel information for all detected hotspots. I have no crowding here: There are only two other routers I can see and the signal is so low they couldn’t interfere with a gnat.
What I Did When HeatMapper Found No Signals
One thing I ran into before being able to complete this fun-waste-of-an-afternoon project is that your wifi chipset has to support monitor mode (or promiscuous mode, as it was called back in the day :). If a chipset doesn’t support it, HeatMapper just sits there waiting for signals and nothing shows up. Not surprisingly, the Intel Centrino Wireless-N 2230 chipset in my laptop doesn’t support monitor mode. I remembered that I bought a Netgear N300 Wi-Fi USB Adapter last year to help with a project I worked on (which had been buried in the back of the Jeep, long-forgotten). I plugged it in an HeatMapper immediately started picking up signals.
(Special thanks to Patrick Norton of TekThing for introducing me to HeatMapper! I’m super excited to see him still on the air. You should support his show at https://www.patreon.com/TekThing)
Dual-boot Windows Technical Preview (aka Windows 10) on a UEFI-Enable Computer
I’m really excited about the Windows Technical Preview (aka Windows 10) that was released today. I decided to forgo a virtual machine and dual-boot it on my laptop running Windows 8.1. My laptop is an Asus G55VW and the existing Windows 8.1 installation being setup in UEFI (with the requisite GPT partition scheme).
I downloaded the image and made a flash drive using the Windows 7 USB Download Tool, but when I booted from the drive and tried to install, I got an error message: “Windows cannot be installed to this disk. The selected disk is not of the GPT partition style” when I clicked on the empty partition I wanted to install to.
I realized the flash drive was booting the MBR installer, but I needed UEFI. I realized I needed a USB flash drive setup to boot the Windows Technical Preview installer in UEFI mode. Here’s what I had to do to create the bootable flash drive that does just that:
- Plug a flash drive into a USB port on your machine.
- Download the Windows Technical Preview 64 bit ISO at http://preview.windows.com (you’ll have to join the free Windows Insider program and click through a few screens to get to the download link)
- Download Rufus. Rufus is a small utility that will put the ISO files on a flash drive you can use to boot from and install Windows. While there are other utilities that do this, Rufus allows you to specifically setup the flash drive as a GPT boot device. This will allow you to install Windows Technical Preview on a GPT drive, side-by-side with Windows 7/8/8.1.
- Launch Rufus.
- Set the Device dropdown to the flash drive you want to turn into a technical preview installer.
- Set the Partition scheme and target system type dropdown to GPT partition scheme for UEFI computer.
- Click the little disc icon next to the ISO image drop down and point to the Technical Preview ISO you downloaded in step 1.
- Click Start and wait until the status says DONE.
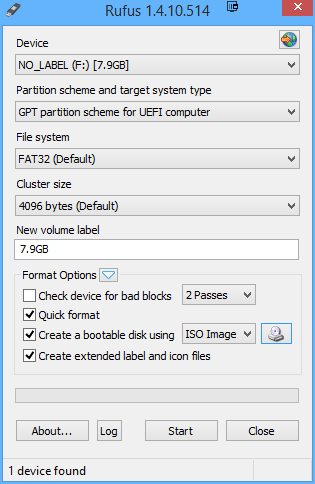
Setup Rufus as shown, using the Windows Technical Preview ISO as the source image
You should now be able to boot from the USB drive and install the 64 bit Technical Preview in dual boot on most machines that boot using UEFI and have a hard disk with GPT. I’ll leave it to you to find out how to create a empty partition to use for the installation, but at least now you will have a UEFI flash drive installer.
Appalachia 2050
I just had the pleasure of finishing a documentary by Prestonsburg native Ralph B. Davis entitled Appalachia 2050. Davis interviews several influential and educated people in Eastern KY, asking them what needs to be done so that the region will have overcome the issues still present after nearly fifty years of LBJ’s War on Poverty.
The consensus seems to be that the War on Poverty has indeed improved the well-being of most of Eastern KY’s poor, however, we are far from where the program hoped we would be compared to the current national averages in areas such as education, health, job opportunities, and economic growth. Nearly all participants believe that cooperation within the region is the number one key to helping the area thrive by 2050.
I encourage anyone who is interested in the future of Eastern KY to watch this documentary. I also encourage Mr. Davis to keep giving us these thought-provoking pieces because they create useful conduits for dialog. I cannot wait to see his next project, whatever that may be.
A Fix for Windows Installer Error 3728
If you ever get a Windows Installer Error Code 3728, I found a really easy fix that might work for you. ( I say might because I’ve had many problems with MSI installers over the years and it has normally been a lot of trial-and-error to fix them.) As with any fix I post, follow these steps at your own risk. There’s no way I can know every single configuration out there and your mileage may vary.
- Click Start, type regedit.exe, and press enter (Give the ok for Administrator privileges if you have UAC enabled).
- Right-click on the HKEY_CURRENT_USER hive and choose Find…
- Type (or copy and paste) this key into the find box: {B54F3741-5B07-11cf-A4B0-00AA004A55E8}
- If this key is found anywhere in the HKEY_CURRENT_USER hive, right-click and Delete it. Very, very important: Do not delete this key from any hive other than HKEY_CURRENT_USER. Doing so may seriously mess up your system.
- Re-run whatever you were trying to install that was failing. If the install goes through, you’re good to go. If not, keep Googling because that’s all the medicine I’ve got for Error Code 3728 :)
As far as why this error occurs, it has something to do with the TrustedInstaller account permissions. The various sources I read to help me fix this issue had a lot of conflicting information and I managed to piece this fix together from bits and pieces of a few of them. I hope this helps!
Get Rid of Text Formatting (in Almost Any Program)
Have you ever copied some text from a webpage (or any formatted program, for that matter) and pasted it into another program only to find that all the fancy formatting simply doesn’t look right in its new location? If I had a nickel for every time that copy and paste between program hasn’t played nice, I’d be a wealthy man…Anyway, I’ve always relied on a trick that most people don’t think about when I want just text and nothing else:
- Copy your text from your source (no matter how heavily formatted it may be)
- Open Notepad
- Paste the text into Notepad
- Highlight and copy the text from Notepad
- Paste your (unformatted text) into the destination program.
This tip isn’t rocket science, but a lot of people have never thought if it.
Google Search Tricks
Google is, in my opinion, the search engine that all other search engines aspire to be. You throw in almost any half-way coherent word or phrase and Google will try its best to show you everything it thinks relates to that phrase.
The cool thing is that there are many ways to help Google find exactly what you want. Usually, it’s just a matter of using a few symbols or prefix words to get more of what you want. Check out the examples below:
Search a Specific Site for Some Words or a Phrase
To search a specific site, use:
site:wired.com wearable computer
In this example, we are searching the website wired.com for the terms wearable computer. Just put the URL of a site you want to search after site: and you’re good to go. (Make sure not to put a space between the colon and the URL or it won’t work.)
Search for Synonyms of a Word
Putting the ~ character (called a tilde or colloquially a squiggly) before a word causes Google to search for that word and its synonyms. For example, searching for
~colleges in canada
brings up sites that are about colleges, schools, universities, and education in Canada. All those words are synonyms (or have ties to the meaning) of college.
Use Double Quote to Search for Exact Phrases
If you know you’re looking for an exact phrase, you can include the phrase in double quotes, like:
“green turtle”
If you’re searching for a common phrase, most of the time, this won’t alter your results much because Google usually tries to go with exact phrases when it can, however, it can sometimes help you get more specific. (By the way, if you do a Google search for “green turtle” with and without quotes, the results are a little different.)
Exclude Sites that Contain Certain Words
It’s possible to exclude sites that have certain words in the results. Simply put a minus sign (-) in front of any word you want to make sure DOES NOT appear in the resulting pages. (This next example is liable to get me hurt but…) For example, if I wanted to search for wildcats but didn’t want any pages that mention Kentucky in them, I could type:
wildcats -Kentucky
(If you do search for wildcats without excluding Kentucky, Kentucky Wildcats is the fifth listing. If you do it with -Kentucky, you get much different listings.)
Search for Specific Filetypes
If you know the type of file you are looking for, you can use filetype: followed by the extention you are looking for. For example,
filetype:jpg woodrow wilson
would find only jpg files with the words woodrow wilson in the filename. (Note: This usually doesn’t work with the extensions: mp3, avi, mov, or mp4 because Google got in hot water back in the day for making it so easy to search for pirated media files.)
Look for Definitions of a Word or Phrase
To look for definitions, type define: and the word or phrase you are interested in. So, a search for
define:onychophagia
would give you that definition. (Note that the definitions returned are usually correct, however, I have seen cases where the definition may be wrong. You must use your own judgement on this. [but the definition given for my example is correct :) ])
Find Something by a Specific Author
Use author: to find something by a specific author. So
systems success author:mclean
would find articles on systems success authored by anyone with the name of McLean. (Note this isn’t 100% foolproof, but if you know an author you are looking for, it doesn’t hurt to try it.) An excellent source for searching for academic articles is Google Scholar. This has helped me with many papers over the years.
There are many more Google tricks (and I’m sure many that I don’t know about), but the ones listed above are the ones I use almost on a daily basis. Google google tricks and you’ll find many articles on the subject.
What to do if the iOS Message App is Stuck Upside Down
Recently, I ran into an issue with the iOS Message app being stuck upside down on an iPad. By that, I mean it would not rotate to the right orientation and was facing 180 from the power button. The first thing I checked was the rotational lock, but that wasn’t enabled (and, besides, all other apps were rotated correctly). My next thought was to close and reopen the app, in hopes that restarting it would fix it. Luckily, that worked. Here’s how to close and restart an app:
- Tap the Home button one time (to get back to the Home Screen)
- After you’re on the Home Screen, wait a couple seconds, the double-tap the Home button. (This will bring up the multi-tasking bar at the bottom of the screen)
- Tap and hold on the Message app icon (or any icon, for that matter) in the multi-tasking bar until the icons start to jiggle. The jiggling icons should also have a red circle with a white minus sign (-) in the corner.
- Tap the red circle with the white minus sign in the corner of the Message app.
- Tap the Home button to close the multi-tasking ba.
- Open the Message app back up.
Hopefully, the Message app will now be rotated right-side up, as it should be!
RaspBMC is Awesome Once You Get It Running
Last night, I finally got RaspBMC running on a 512MB Raspberry Pi, complete with Wifi capability! The setup is serving up episodes of Big Bang Theory ripped from my DVD collection (with more rips coming as soon as I get around to it). I love the Raspberry Pi Project. Furthermore, RaspBMC is definitely a killer app for the Pi and I’m so grateful it’s being developed.
That being said, I had to do a lot of searching and trial and error to get it all to work the way I wanted. Below are some things I had to do to get it all running the way I wanted.
- I had to forego my really fast SanDisk 8GB Extreme SDHC Class 10 SD Card
for a much slower Class 4 card. Two different Class 10 cards would go corrupt after a few reboots, resulting in the error “Kernel panic – not syncing: VFS: Unable to mount root fs on unknown block(179,3)” Switching to the much slower Class 4 card has eliminated the error (as of about 15 reboots).
- I couldn’t use the fancy installer. Everytime I did, the Pi would get stuck in a loop reboot loop complaining about a failed update. I ended up using the pre-built RC5 image: The last resort ended up being the only one where I could get really far into installation.
- The super-tiny Edimax EW-7811Un 150 Mbps Wireless 11n Nano Size USB Adapter
works incredibly well without having to install any drivers (at least with the RC5 pre-built image). I have never bought such a cheap piece of hardware that ended up being so awesome. Note that to setup your wifi connection from within the GUI (which is what I did), you’ll need to install the Network-Manager addon from the XBMC addon repository.
- The official XBMC Android Remote DOES NOT work with RaspBMC RC5. It’s a known issue. Apparently, there was a change in the remote communication API that has rendered the remote broken for XBMC 12. The Yatse remote app works great and allows me to pick what’s playing from my phone screen instead of having to squint at the TV.
- I disabled automatic updates (even though it’s strongly encouraged not to do so) because it doesn’t seem to play nice with my Hughesnet.
I encourage anyone who is struggling to get RaspBMC up and running to NOT GIVE UP. It’s awesome once you get it working. And eventually, I’m confident that the RaspBMC devs are going to release an out-of-this-world distro that just works out of the box. Until then, I’m more than willing to work around these little issues and keep cheering them on!
Right click in the bottom left corner of Windows 8 for some awesome options
I really like Windows 8. I’ve upgraded my desktop and my netbook (which I’m typing this post on) and it has made both machines run faster than Windows 7. Windows 8’s designers thought of all sorts of little things that I absolutely love.
My favorite is right-clicking in the bottom left corner of the screen (no matter what mode you are in). You’ll be greeted with an awesome menu with a bunch of Power User favorites.

Right-click the bottom left corner of a Windows 8 screen to get this sweet menu with loads of Power User favorites.
The menu includes the following shortcuts (with my favorites in bold):
- Programs and Features
- Mobility Center
- Power Options
- Event Viewer
- System
- Device Manager
- Disk Management
- Computer Management
- Command Prompt
- Command Prompt (Admin)
- Task Manager
- Control Panel
- File Explorer
- Search
- Run
- Desktop
This list is a who’s who of stuff that Power Users, system admins, and lab managers use every single day in one quick-to-access place. If you are one of these people, make sure to add this to your mental toolbox. Happy admin’ing!