Creating a System Image in Windows 8 Without Using Third-Party Tools

I took the plunge about three weeks ago and upgraded from Windows 7 Home Premium to Windows 8 Pro. (I took advantage of the fantastic $39.99 upgrade deal, which is good until January 31, 2013.) I’m not going to do a full review, but suffice it to say I think Windows 8 is great. It has a learning curve and the Start Screen freaks a lot of people out, but I promise, there’s more to like than dislike once you get used to it. It is definitely faster than Windows 7 and I think it was a step in the right direction.

As always with any major OS upgrade, some stuff gets moved around or changed. I’ve had very little trouble getting used to things, but then I asked myself, “How can I create a System Image in Windows 8 that will allow me to restore EVERYTHING in the event of a hard disk crash?” This should be simple. It was very easy in Windows 7. Why on earth would they ditch it in Windows 8? I found a post about the new Windows 8 File Recovery feature, which looked like a brain-dead version of Windows 7’s backup. Thankfully, though, the Windows 7 Backup tool is included with Windows 8: It’s just hiding. Here’s how to find it:

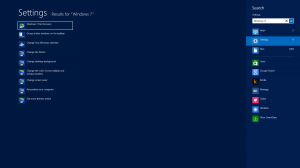
  1. Hit Windows Key+Q to open the Search Charm
  2. Type “Windows 7” in the Search box (without the quotes)
  3. Click “Settings” below the search box.
  4. Now, on the right-hand side of the screen, you should see Windows 7 File Recovery.


Hit Windows Key+Q, type “Windows 7”, click Settings, the click on Windows 7 File Recovery to create a System Image in Windows 8.

From that point, you’ll be able to backup your Library files and create a System Image, exactly like you did in Windows 7. If you’re like me, this probably makes you very happy because I usually prefer to use stuff included in my OS to perform backups. (It’s not that there is anything wrong with third-party tools, but built–in means one less thing I have to hunt down and configure :)

[Very Important: You should NOT put backups from Windows 7 and Windows 8 from the same computer on the same backup drive. The Windows 7 File Recovery tool warns against this, and from what I know about backup sets, this would basically create a very inconsistent state since you would have many (very incompatible) versions of the same files all intermingled. It could make a System Restore a very scary proposition. I’m lucky enough to have plenty of USB hard drives lying around, so I left my Windows 7 System Images on the old backup drive and put the Windows 8 Images on another.]
Legend of Zelda Ringtone (Orchestral Style)

I wanted a Legend of Zelda ringtone for my phone. I didn’t want a MIDI because the MIDI engine on pretty much everything these days are terrible and it will sound nothing like the Zelda Theme we all know and love. In my search, I ran upon this awesome orchestral rendition of the Zelda Overworld Theme.

It was a little too long to be a ringtone, so I used Audacity to make this ringtone-ready version of the GREATEST VIDEO GAME THEME EVER!

Sending a Text Message to an Appalachian Wireless Customer Through Email

I just learned the coolest thing: You can send text messages to Appalachian Wireless customers using plain ol’ email. The email address to send the text to is:

<tenDigitPhoneNumber>@awsms.com

So, for example, if your Appalachian Wireless phone number was 606-272-5555, your texting email address would be:

6062725555@awsms.com

I’m sure this is common knowledge to most people, but I didn’t know you could do that. I’d be willing to bet that every other carrier has a similar mechanism, as long as you know what the domain part of the address would be.

Use Points as Your Measurement When You Create Web Slices from Guides in Illustrator CS 5

Today, I found 150 really awesome free vector icons that were in AI format. The problem was, they were in one file on the same layer! The icons were laid out in a row and column pattern, but I had to create guides manually. Once I created the guides, I proceeded to use the handy Object > Slice > Create from Guides feature to chop each icon into it’s own file. After a very long time processing, and much to my dismay, the slices generated were not cut neatly along the guides! There were a bunch of erroneous slices that corresponded in no way to my nice little guide array. It turns out some other people have had this problem and from the several things I read and was able to piece together, there’s a workaround (or at least a series of things I did that lead to a working solution).

  1. I set my ruler units to Points.
  2. I made sure View > Snap to Point was checked.
  3. Then I turned on the Grid (Ctrl + Double Quote) and dragged out my guides so they snapped to the grid.
  4. I grabbed the Select Slices tool and pressed Ctrl + A to select all my slices.
  5. Following that, I ran  the Object > Slices > Create from Guides command again.
  6. This time, in about 10 seconds, I was presented with a beautifully sliced AI file with 150 pristinely cut slices.
  7. From that point, I ran my Save for Web and Devices with Images Only like I have a million times in the past and ended up with a folder full of glorious png icons.

From what I can gather, this issue is common if you use a metric other that Points. Illustrator displays at 72 points per inch (ppi), which must mean their is a bug in some unit transformation somewhere in the program. Let’s hope Adobe gets that fixed so that creating slices from guides becomes a unit agnostic operation.

Fix for Excel 2007 Not Printing Embedded Chart Titles

The other day, I was trying to print some Excel 2007 worksheets that had my data at the top of the sheet followed by charts made from the data below. The charts had titles included, which showed up fine in Preview, however, when I actually printed, the titles were missing! Very strange indeed!

After some digging around, it seems that Office 2007 Update KB2596596 is the cause of the problem. At first, the only solution I was able to find said to uninstall this update and that would fix the Excel printing problem, but I wasn’t satisfied with that.

After some further digging, I found out that Microsoft has released a Hotfix that fixes the problem. (In Microsoft parlance, a Hotfix is a patch that will fix an issue that hasn’t undergone a full suite of testing.) KB2597962 can be requested from Microsoft (i.e. they’ll send you a download link in email, since it’s an unsupported file) by going to the KB2597962 article and clicking on View and Request Hotfix Downloads. Fill out the form and acknowledge the fact that the Hotfix hasn’t been fully tested, and you’ll have a shiny download link in your inbox in no time.

For what it’s worth, I installed the Hotfix on five machines and it has caused me no trouble at all.

Installing Debian 6 on an Asus Eee PC 1015PE from a USB Flash Drive

I used Universal USB Installer to put a copy of Debian 6 on an old 2GB flash drive so I could install it on my Asus Eee PC 1015PE netbook. I stuck the flash drive in the USB port and fired up the Eee PC. It proceeded to boot to Windows, even though the flash drive had been detected by the BIOS. I had already went to the BIOS (via F2) to make sure my first boot device was set to Removable Device. I rebooted, went back into the BIOS, and disabled the hard drive as a boot device. This time, instead of booting from the flash drive, I now see a message telling me to insert a valid boot device. I took the flash drive out, stuck it in another machine, and turned it on. The other machine boots into the Debian installer just fine. What’s a geek to do?

Since the netbook has an AMI BIOS, I tried an old-school trick that AMI has favored for years. It turns out that the 1015PE has an undocumented feature (not listed on the BIOS screen): If you hit escape at the BIOS screen (repeatedly works best), it’ll bring up a one-time boot menu that lets you select from valid boot devices. My flash drive was listed there! I selected it, pressed enter, and after about a 20 minute install, my 1015PE is happily running Debian 6.

Free Utility to Generate MD5 and SHA1 Checksums in Windows XP/Vista/7/8

It turns out that some time ago, Microsoft released a free command line utility called the File Checksum Integrity Verifier for generating MD5 and SHA1 checksums. Best of all, it’s really small (at less than 84 kilobytes) and doesn’t require installation (i.e. can be run from a flash drive).

Microsoft is clear that this is an unsupported utility, but there’s no need for support as it is really easy to use. It will in no way modify your files! To generate MD5 or SHA1 checksums for a file, do the following:

  1. Download the fciv.exe file.
  2. Open a command line by pressing Windows Key and R at the same time, typing cmd, and pressing Enter.
  3. cd into the folder where you downloaded fciv.exe to.
  4. To get an MD5 Checksum for a file, type fciv pathToFileYouWantToCheck (refer to this post for an easy way to copy a file path that can then be pasted here)
  5. To get an SHA1 Checksum for a file, type fciv pathToFileYouWantToCheck -sha1

Happy Checksuming!

What to do if you can’t update your Android SDK Tools because “folder failed to be renamed or moved”

I got up bright and early this morning to update my Android SDKs (during HughesNet’s all-you-can-eat bandwidth time between 2am-7am). Much to my dismay, the Android Tools wouldn’t update from revision 15 to revision 17 because “a folder failed to be renamed or moved.” I have not had this problem updating in the past, so I was stumped.

The folder that failed to be moved ended up being the tools folder in the Android SDK directory. The problem was that SDK Manager.exe had launched tools\android.bat which uses a whole bunch of files in the tools folder. Of course Android can’t move that folder if the program (and it’s dependencies) doing the updating are in the folder to be moved!

Luckily the solution to this turned out to be really simple:

  1. Go the the android-sdk folder (wherever that may be on your system).
  2. Make a copy of the tools folder (my copy was called tools – Copy).
  3. Open the folder that is a copy (i.e. tools – Copy).
  4. Launch android.bat from that folder.
  5. The updater will launch and update whatever you tell it to.
  6. After the updates are finished, close the updater.
  7. You can then delete the tools – Copy folder and launch the SDK Manager like normal.
  8. Observe that everything updated.

Such a simple solution to a goofy predicament!

Use Opera Mobile to Add Proxy Supported Web Browsing to a Kindle Fire without Having to Jailbreak

I love my Kindle Fire, with one big exception: It does not support proxy servers. I use my fire in environments all the time (i.e. public schools) that require proxy support. While I haven’t solved the proxy problem system-wide, I have figured out a way to use Opera Mobile to add a proxy-supporting browser!

Even though the steps below WILL NOT add proxy support to apps for the Kindle Fire, it IS possible to have a full-featured browser (Opera Mobile) on your Kindle Fire that supports proxies. Since Amazon won’t let you install Opera through it’s app store, here’s what you can do to install it and get it ready for proxies:

  1. Go to Kindle settings by tapping the cog in the upper right hand corner of the screen, then tapped More > Device > and turned “on” the Allow Installation of Applications from Unknown Sources
  2. Install the ES File Explorer from the Amazon App Store. (We’ll use this to install the Opera APK. It’s free and a good app to have around anyway.)
  3. Go to the Opera Mobile download page on a computer (not the Fire).
  4. In the Choose an application dropdown box, choose Opera Mobile 11.5 (Android 1.6+) then click the View Download Link button.
  5. Click the International link and save the APK file to your hard disk.
  6. Connect your Fire to your computer via USB.
  7. Copy the Opera APK file to your Fire
  8. Disconnect the Fire from USB
  9. Open ES Explorer on the Fire
  10. Navigate to where you copied the APK file to and open it (which will initiate an install, where you click “OK” to everything)
  11. Go back to the home screen and go to Apps. Launch Opera.
  12. In the Opera address bar, type opera:config
  13. In the HTTP server box, type the address of your proxy, a colon, and the proxy port (i.e. youProxyAddress:8080 ) [Note: You can type in proxies for HTTPS and FTP if you need proxy support for those as well ]
  14. Check the Use HTTP box (and HTTPS and FTP boxes if you need those)
  15. Click Save

Now when you go to a page in Opera, you will be prompted to enter your Username and Password (for authenticated proxies). As I said earlier, this does not solve the problem with apps that need proxy support, but at least you can use a browser with proxies using this method.